Pages

Saturday, October 16, 2010

Updated Laundry Room

I've said it once, i'll say it again... The laundry room is my LEAST favorite room in the house.  Unfortunately it is the room I spend HOURS in. (Much to my chagrin)  Well,  I decided to do something about it. 

Let me first explain to you what I have lived with for 4 years.  Plain walls, nothing on them.  No depth, just  filth  clutter.  Open shelves that were an eyesore, and don't even get me started on the kitty litter box (I'm not a cat person, how on earth did I end up with one???  Oh, yea... little girls) It literally was a prison cell without the bars but with the washer and dryer. 

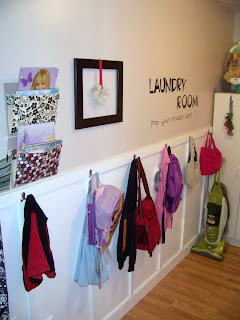
First I had to add some dimension.  I have seen tons of wainscotting tutorials out there, but I just loved this one from Newly Woodwards.  But it was a little complex so I simplified.  I didn't use the plywood behind it, just painted the walls white.  I also used 1"x2" boards instead of 1"x3".  But I love the way it looks.


And that little problem with the kitty litter box, See that curtain on the right.  Yup, the litterbox is behind there and Mr. Kitty has no problem with it!  I also made a burlap curtain for the window using this tutorial over at Brown Paper Packages.

Of course the whole design color scheme is based off this cute fabric I found at JoAnne's for the Ironing board cover.


I just couldn't resist the "Sock" exchange I found here

And would it really be a room in MY house without vinyl....


I picked up these boxes at Target when they were on sale (2/$7) And my girls added a little ribbon for "style"

Now every one has their own hook for backpacks and jackets. (and most the time they actually get hung up here!)

I made this cute little addition using a wire hanger and a strip of burlap.  Then just hung it by ribbon in an old frame painted black

I needed a pop of color so we made this heart picture with felt and pins.  I love how it turned out!

Well, It still isn't my favorite room.  But at least it is a little bit more bearable now.

Linking Up With
Friday, October 15, 2010

Birthday Cakes!

Sorry I haven't been posting.  October is definately one of my bussier months.  I've got 3 October birthdays (On the 2nd, 13th, and 19th)  And each one has to be an extravaganza in their own right.  The big one this year is my youngest girl turned 5 last week.  and it was really a fiasco.  I've always had "family" parties for each of my kids.  But we reserve the "friend" parties till after they start Kindergarten.   Well, my little girl barely missed that cutoff for Kindergarten this year and she REALLY wanted a party.  But I held my ground (I've gotta make it fair for everyone)  So we ended up just taking a few kids out for icecream that day (not technically a party!)  Anyway's I've decided to share some of the cakes we've done in the past for the kids.  They each choose their own style, and get exactly what they want...
Stawberry Shortcake Birthday Cake


Gotta Love the child who only wants doughnuts (so much easier than baking a cake!)


Animal Print Birthday Cake


Neon Colors Birthday cake/cupcakes


Once again gotta love it when it is a basic Cheese Cake (nothing fancy!)


My little Pony Birthday Cake!

Green Dinosaur Birthday Cake!


Pirate Ship Birthday Cake!

Well, only one more birthday to go this month!  Hopefully I can get back into the swing of posting again!

Tuesday, October 5, 2010

BOO!

This is a super easy and cute way to “scare” up a shelf. I took the word BOO and changed out the O’s for eyeballs. Once again heading into the garage for scrap wood I used a piece of 1”x6” pine.  I cut them at 3 different sized (just because I like a little chaos)

I sanded down the edges and painted it black.

Using my wonderful Sure Cuts Alot 2 I used the font Burton’s Nightmare to cut the B.   I used a scrap of Halloween paper I had in my stash and Mod podge'd them onto the largest piece of wood.

Then I used this outline (I found on the web) to create a cutting file.

 (Maybe I’ve just become lazy, but I pretty much use my Sure Cuts A lot and Cricut with everything I do!Seriously, it is worth the $60 for the program!)

Then I just Mod Podge’d everything all together. My little kids think they are great ( but not too spooky) but my bigger little kids loved them because they weren’t “cutesy”

Super Easy, and just what I needed for this shelf!

Linking Up With


Sunday, October 3, 2010

Chandelier Decor for a Little Girls Room

My 2 youngest girls (ages 8 & 4) have been begging me for a chandelier for their room. Not necessarily a functioning one (although that would be nice) just one to hang in the corner with “pretty diamond thingy’s” on it.  I've looked around and I just couldn't make myself spend upwards of $35 dollars for one.  So I decided to make my own!


We used a piece of foam board (I think they are about $3 at the craft store). Using a template that I found here I cut out 2 of them with an X-acto knife.  
 Then I made a slit down the middle at the top of one and the bottom of the other.  Then I just them together and added a little glue to hold them in place.


For the final touch I  draped some of the plastic “diamond” necklaces all over them.


The best part was the squeals of joy from the little girls. I guess a chandelier in your room means you really are a princess!

I'm thinking I need to make one in black and hang some spider webs from it for Halloween.... We'll have to see what happens.

Linking Up With

Under the Table and Dreaming
Keeping it Simple
Cottage Instincts
The Girl Creative
I Heart Nap Time
Kuzak's Closet