Pages

Tuesday, September 28, 2010

Wow! A Blogging Award!!!

Holy Cow!  I got an award... Its my first one.... THANK YOU  Beth at Sand To Pearl 

So here are the rules...

1. Thank and link back to the person who gave you the award.


2. Share 7 things about yourself.

3. Pass the award along to 15 other bloggers who you recently discovered and think are fabulous.

4. Contact the bloggers you chose and let them know about the award.


Alrighty.... Lets see, I've thanked Beth!  but once again for good measure.   THANK YOU BETH AT SAND TO PEARL!  You're the best!
 
2-  HMMM... 7 things about myself.  I'm a pretty open book (sometimes too open, if you ask my "quiet & shy" husband)
    
     1- I have OCD when it comes to crafting.  I just have to finish it NOW!  It can't wait till tomorrow.
    
     2- I have 7 gorgeous children.  4 of them were born naturally by me, the other 3 were by the easy way (marriage) But I don't believe in the word "step" (ie. step-children) it is just another way of "labeling" kids that doesn't do any good for anyone.
    
      3- I met my husband while working and kept a HUGE secret from him for 5 months.  I was recently divorced and found out I was pregnant right after the divorce was final.  I just "forgot" to mention to my new Hubby (then cute boyfriend) that I was prego.  I never stood up from behind the desk.  Until I was about 7 months along, and I just stood up!  He almost swallowed his tounge (sorry hun)  But he stuck by me, and he adopted that little girl as his own shortly after we were married.
   
     4- I am addicted to SUGAR!  Yup, that's right, sugar.  I don't have a sweet tooth, I've got a whole sweet mouth.  Especially sour, chewy ones. (My dentist hates me!)
    
     5- MOUNTAIN DEW!  Need I say more.  If I don't have one, i'm not a nice mommy
 
3- How do I narrow this down to 15 other bloggers!  There are so many wonderful ones out there....  I guess i'll Try
 
     1-Keeping It Simple I adore what she can do with a few scraps of wood and some mod podge.  Her name blocks are the perfect gift.
 
 
     2-Creation Corner Such a great blog!  Always something to do, and it inspired me to try shirring.  Now I can't stop
 
 
     3-Mad in Crafts She has postings under Shamefully Simple.  What a great idea!  I'm sending the kids out for leaves right now!
 
 
     4-Living With Punks I had to post this one, if not just for the name of her blog.  Wish I would have thought of that one!  My kids all have their own aprons thanks to her!
 
 
     5-Night Owl Crafting I'm not sure where she gets her ideas.  But I love them all...  I'm heading over to Home depot Right now to pick these up!
 
 
     6-Craftiness is Not Optional I love the clothes she makes.  What an inspiration!
 
 
     7-Eighteen 25 They have some of the cutest downloads.  I have got to try them all...
 
 
     8- Crafty Cupboard Her spider web table runner is going to look great on my piano.  I can't wait!
 
 
     9-Executive Homemaker  She has the greatest ideas for staying organized.  And I could always be more organized!  My husband is so excited over the monthly spending worksheet


     10- The Crafters File Box Just the place to be inspired.  I frequent over there for more ideas.
 
 
     11- Craft Envy Her blog is great, and my kids LOVED the wing recipe!
 
 
     12- Until Wednesday Calls I love her idea on organizing carded buttons.  Now i've got to get more carded buttons!
 
 
     13- My Frugal Family  My daughters have been begging me to make them up some of these Skeleton hand hair bows.  The best part is the dollar store price tag!
 
 
     14- Blue Cricket Design Her Lunch Time Love Notes are so much cuter than my post it notes I stick in the kido's sacks.
 
 
     15- Organize and Decorate Everything- She has the cutest window here that she changed up the whole look with just a little vinyl (and you know that's my favorite)  I have got to try it!
 

Tuesday, September 21, 2010

What can you do with a $1 piece of particle board?

While shopping at one of my favorite stores (The Home Depot) I often frequent the “left over” wood section. This is the place where the pieces of wood that have already been cut and they have odd shaped or measured wood that they can’t sell for full price. So I get to buy them cheap! They range anywhere from $0.50 to $3.00 a piece. I found 3 pieces of 3ft x 4 ft particle board for a $1 a piece. I thought to my self, “Self, buy them, Christmas is coming up” So I did!

Once home I’ve set out on a mission on figuring out all the great things you can make with a piece of particle board. Here’s what I’ve come up with so far…


Welcome sign (the words around the edges are Welcome in 8 different languages)


I showed this one in a previous post but it fit here too!


Proclamation for The Family


Halloween Subway art.  I just love the look of this one!


More subway art, with a great message.  My kids love this one.

What ideas do you have for the particle board?

Linking Up With

Friday, September 17, 2010

I finally did it!

I have been waiting for the new Cricut to come out.  And I have to say after seeing it's capabilities, i'm really not that impressed.  (I know, I'm horrible)  I've got  printer already, and I HATE to buy ink for it, so why would I go out and purchase a Cricut that I have  to dump $ into for ink???

I'm cheap, I admit it, it's one of the things my husband loves most about me.  So while surfing around on ebay the other day I found a fantastic deal on a brand new Cricut Expression.  $200 for the expression, a mat, a couple of tools, some vinyl, transfer paper & glass etching stuff, and 2 new cartridges.  So I bid on it.  I'm going to call it an impulse buy!  And I WON!!!  I never win on ebay (cause i'm cheap)  Then the thought hit me.  I can't afford this.... what to do?   I've got to sell some stuff.   So I sold my old personal cricut (still in excellent working order) and some cartridges (I haven't used cartridges in over 9 months)  and WHAM BAM THANKYOU MAM  It was paid for!

Now one of my friends was asking me about selling my cartridges (since they work on all machines) and I told her that since I had purchased the Sure Cuts Alot 2 back at Christmas I hadn't used any of them.  But it got me thinking.  WHAT IF.....  What if I find myself suddenly needing one of the images on a cricut cartridge????  So I set out to work and I figured it out.  I can use my Design Studio (purchased before Sure Cuts Alot) to trace the image.  Then use inkscape to turn it into an SVG and then I cut it out.  I just opened up the whole Cricut library to my Sure Cuts Alot!  (OOPS, sorry Provo Craft!)


Then earlier this morning, the UPS guy pulled infront of the house.  I almost squeeled with excitement (only 2 days in shipping)  My little 4 year old ran outside so fast I think she scared him.  He smiled at her and stated.... "Gee, did you get a new toy?"  To which she exclaimed, "NOPE, my mommy did!"   and I am in love with it. 

And she loves it too!

Tuesday, September 14, 2010

Kids enjoying CLEANING!

I think I have finally lost it...   At this exact moment, my kido's are in the other room actually "fighting" over who gets to CLEAN!  I didn't think I would live to see this day.  How did I do it???  Some new chore chart, or the best reward system around.  NOPE.  Rolling the dice.

Let me start at the beginning.  I searched out, getting kids to clean on Google a while back and came across a few ideas.  The best one was to turn it into a game.  My kids favorite, the color game.  I shout out a color and everyone scrambles to put away that color, who ever puts away the most things wins the game (and usually gets a cookie)  They liked this so much I did some more research.

I saw these on a great blog, and for the life of me I can't remember which blog it was on (if it is yours let me know so I can link to it)  It is the cleaning dice....


It is just a simple 4x4 post cut down into a dice.  I sanded it and rough painted it (i figured why spend a lot of time on the finish, the kids would 'ding' it up rolling it)  I then added the vinyl with the daily house hold cores (sweep, vacuum, family room, bath room, kitchen, and of course FREE DAY) 

Here are the rules. 
     1)  First one done with their rooms gets to roll the dice first. 
     2)  Whatever it lands on that is your chore. 
     3)  If you land on the Free Day, you don't have to do chores that day. 
     4)  If a chore has already been rolled you must roll the dice again. 
     5)  You can't get a Free Day 2 days in a row.
     6)  If you finish your chore you can earn an extra snack by rolling the dice again.

The kids LOVE it. Then I decided, why not make the colored dice.  For when the play room is REALLY messy.  They roll the dice and that's the color they pick up.


Linking Up With


Wednesday, September 8, 2010

Quick Tooth Pillow

At 8:00 pm last night my 6 year old little boy lost a tooth.  Yup, right at bed time.  Normally not a big deal, but when I went and got out our tooth pillow his little eyes went from joy to irritation. 

"MOM, don't you think that's a little girlie???"

What to do? I've got 5 girls, he's my oldest boy!  Why was I not more prepared....

So I attempted to just free hand cut a rough tooth outline on an old pillowcase and I even attempted a little pocket on it. 

Needless to say, it was an EPIC FAILURE. There is a reason I use patterns....

Now it is 8:15, and it is past his bedtime (I HATE when they are off their schedules)  So I put him to bed with the "bad tooth" pillow and PROMISED him there would be a much better, manly pillow when he woke up (kinda like Christmas!)

I immediately hopped online and searched through thousands of pictures of "girlie" little tooth pillows until I found this pattern at MMMCrafts.  It was too "girlie" but it is something I could work with. 

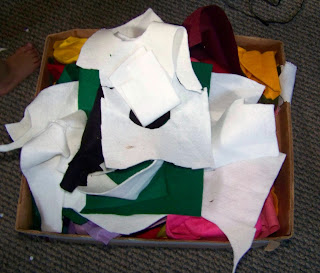
I downloaded the pattern and set out to work immediately using felt this time.  It is so much easier to use for a project like this, but it means I have to pull out the "FELT BOX"

It scares me.... Why can't I throw a scrap away (but that's a whole different story)

Anyways, I made the pocket mouth a little bigger but it is basically the same pattern.  The best part was deciding the style.  I had to channel my inner 6 year old boy......

PIRATE!

It was SO simple just to add an eye patch.  And it really makes it "manly" according to my son.

I absolutely love that it has a handle to hang it from, no more "tooth fairy" accidents.  She can just fly right on up to the top bunk and switch out the tooth without fear. 

Linking up with:


Tuesday, September 7, 2010

Updating a Kitchen on a Budget

I’ve got an L shaped kitchen. Technically I've got an "eat-in" kitchen, but technically the dining area is around the corner, so if I want to be spiffy, i've got a separate dining area.  I love my kitchen, but it drives me crazy. The floor doesn’t match the counters and vice versa. I can’t find a backsplash that will match both. I’ve thought about white subway tiles, but that conflicts with my “cheap” side. When we bought our home it had a basic white, laminate kitchen. No special lighting, nothing to make it stand out (except the old 1960’s style above the sink) So a little while ago I decided it HAD to change, maybe just a little more updated?


Our stove finally went kaput (seeing that it was a hand me down from my Mom’s house, not too bad, it was only 20+ years old)

So my hubby and I shopped around online and found a great stainless one for $150 and it's only a couple of years old. Yup, only $150, I couldn’t believe it either. It was filthy, but with A LOT of elbow grease it looks great.

In addition to that little number, I sold some of our old items that were gathering dust in the garage and was able to purchase an above the stove microwave. So I set out with a mission. How do I make the kitchen “pretty” without spending a lot of $$$$$
Here are my before pics….


And this is now!
(sorry my counter tops are RARELY spotlessly clean)


I moved the cabinet above the stove and installed the over-the-range microwave (CAUTION- ask for help, my back hurt for a week after this, and as a side note the correct way to install one of these puppies is to let your husband do it.  The frustration just isn't worth it!) That cleared up a lot of counter space.

I removed the little wooden swag thingy above the sink and did a little touch up paint.

I had some under cabinet lighting hanging around in the garage, so I snapped that up and installed it under the cabinets

I ran down to Home Depot and picked up a thin piece of crown molding and put that around the tops of all the cabinets (it cost me about $20 for the molding)

Now on to the FUN stuff....

For the cabinets I ran to the dollar store and picked up a bunch of fake grass and put that in bunches on top of the cabinets (about $8).  Using some scraps of wood in the garage I spray painted them red ($3) and used my vinyl to cut out words (Enjoy, Bon Appetit, Delicious, and Gourmet)  Then I ran through the house looking for little nick naks to put up top.  Some vases, little iron thingy's, ect.  Finally I ran some rope lighting ($10) to brighten it all up.

For the 2 windows I found some clearance material at Home Fabrics for $2/yard and made some faux shades.
For the light above the sink I picked up a hanging light from IKEA (i think it was $8) and hung it myself.  I even took a little black paint and painted the brass light fixtures to make them a little more updated.

Total: $53
It may not be perfect, but it is definitely a little better than before.

PhotobucketAll Thingz Related linkparty
Get Your Craft On Tuesday

Monday, September 6, 2010

Ideas for Craft Meeting

I've been working on a couple of ideas for our October Relief Society Meeting.  And I figured I would get your opinion of a few of them.  We only have a half hour for each craft, and we have a large variance in ages (from cute little 21 year old newly weds, to well established grandma's)  What do you think?

Establish a House- I figure to fit into our time frame I would have the wood plaques already painted either white, black, or brown.  And the vinyl is precut (should fit into a half hour)

Pretty self explanatory, White plate, precut vinyl


Temple vinyl (thanks Kaseys Kreations) on Glass Block

This one I could have the blocks pre-painted, they bring their own craft paper.  Really easy, just modpodge & tie raffia.  Vinyl wording is pre-cut (hopefully only a half hour) Thanks Curly Q Crafts for the great idea!

I just loved this "family tree" over at Peak View Enrichment I'm pretty sure it isn't a half hour (mine took about 1.5 hrs, but I just loved it)

Just a little something cutsie from my home.  I downsized a burlap wreath (its supposed to be a heart) and hung it by ribbon inside a frame.

Keeping It SimpleMakingThe Girl CreativeBWS tips button