Let me first explain to you what I have lived with for 4 years. Plain walls, nothing on them. No depth, just
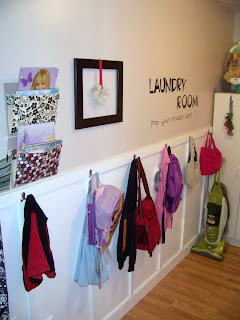
First I had to add some dimension. I have seen tons of wainscotting tutorials out there, but I just loved this one from Newly Woodwards. But it was a little complex so I simplified. I didn't use the plywood behind it, just painted the walls white. I also used 1"x2" boards instead of 1"x3". But I love the way it looks.
And that little problem with the kitty litter box, See that curtain on the right. Yup, the litterbox is behind there and Mr. Kitty has no problem with it! I also made a burlap curtain for the window using this tutorial over at Brown Paper Packages.
Of course the whole design color scheme is based off this cute fabric I found at JoAnne's for the Ironing board cover.
I just couldn't resist the "Sock" exchange I found here
And would it really be a room in MY house without vinyl....
I picked up these boxes at Target when they were on sale (2/$7) And my girls added a little ribbon for "style"
Now every one has their own hook for backpacks and jackets. (and most the time they actually get hung up here!)
I made this cute little addition using a wire hanger and a strip of burlap. Then just hung it by ribbon in an old frame painted black
I needed a pop of color so we made this heart picture with felt and pins. I love how it turned out!
Well, It still isn't my favorite room. But at least it is a little bit more bearable now.
Linking Up With


 This is the beautiful fabric that my then 6 year old daughter picked out for my craft room. Perfect for the girls... not so perfect for the Mommy. So I decided to upgrade to a "big girl" room.

 Next I grabbed a can of black high gloss spray paint and went to town on my old DI dresser. It looks great now and after adding vinyl lettering to it I can tell just where my fabric's are. Nice and organized (till my little one's get ahold of it) I pretty much spray painted a TON of things, picture frames, boxes, shelves, a chair... Anything that couldn't defend itself :) (I'm pretty sure my 2 year old has a few spray painted fingers & toes as well)
 Next I headed over to "Home Fabrics" to grab some "grown up" material. I found this great black & white print for only $4.99 a yard. LOVE IT! I turned it into all the window coverings by making up these faux roman shades. Then I took some more spray paint and covered a few more of my containers so they would match the room.
 I put this cork board up on the outside door. I used a little ribbon to hang it and then put a couple of magnets on the back so it wouldn't swing everytime we opened the door.
 I just love it! What do you think???