Pages

Monday, August 30, 2010

An Updated Wreath

I have been trying to make my front door more inviting.  It was originally white, then green & now I've painted it black.  (Finally a door I like!)  The biggest problem I have is I don't have an actuall front porch.  Don't get me wrong, there are steps leading up to the door an a small cement square to stand on before you enter.  But it isn't big enough to decorate.  It drives me crazy.  I would love to have one of those inviting doors with cute little things set to the side welcoming visitors to my home, but no such luck....

I have probably tried out at least 25 different wreaths and various door hangings.  But once again.... nothing that would "stick"  That got me thinking.... stick.... VINYL!   Of course, it is everywhere else in the house, why not the front door!  So up went the WELCOME sign
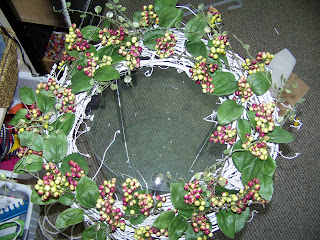
Now onto the wreath.  I picked up a cheap vine wreath at Michaels using a coupon that I had and spray painted it white so it would really pop against the black door
Next, I headed over to Roberts and picked up a vine with some cute yellowish-purplish berries, leaves, & twigs. (using the 40% off coupon it only came to $3.50) When I got home I had the little ones help me tear apart the vine so I could start gluing.  First I put on the leaves using a little dab of hot glue
Then I followed it up with the berries and vines
I hung it to the door using a clear, over the door wreath hanger (I love this one, it actually has 2 hooks, one for each side of the door so I can hang something on the inside of the door)
I'm thinking of adding a wooden letter hanging in the center of the wreath, but my creative side wants to create some sort of holiday hanging for that spot.  That I can change out with the seasons/holidays.  I guess we'll see what comes.

Show and Tell Green
Make it Yours @ My Backyard Eden


Thursday, August 26, 2010

Down East Basics Inspired T-shirt

My beautiful daughter came home the other day from a back to school shopping extravaganza with some adorable clothes. One in particular is a really cute shirt from Down East Basics
It is called their Soft & Pretty Top (which it is) and it costs about $25. Not TOO extravagant but still more than I would spend on a shirt for myself. I kinda chuckled when she showed it to me and then set out to make one of my own.  I hit the dollar store yesterday and they had just refilled their t-shirt bins!!! Yea, for me. I picked up a couple white t-shirts for $1.

First I decided that I really didn’t want the longer short sleeves, I really wanted more of a cap sleeve. So I cut of the sleeves.

Next I decided where I wanted the neckline to fall and drew it out with one of my quilting pencils,


Then, take one of your extra t-shirts and cut strips off the bottom. Just a little note here, my first attempt I used 1” strips and when I got it all sewed together it was WAY too heavy and pulled the shirt down. I would recommend ¼” – ½” wide strips.

Take these a sew them onto the top edge of your shirt then braid as you sew. I guess you could braid and then sew it on, but I was trying to hide the stitching so I would sew and then cross in front of the stitching. (sorry, my pic’s here didn’t turn out) Continue around until you have a 2 “ gap between the start & finish of the braided neckline. (you want this gap for the flower)

I took some of the scraps from the extra t-shirt and turned them into a few simple ruffled flowers (I’ve seen so many tutorials on this, I won’t add one here, unless you really need one! Let me know)

Then just sew them into the gap on the neckline… I added a few strands just for some dimension, but it would be up to you.

I really wanted some texture on the sleeves, so I made a couple slits and tied some small knots.
I love it, What do you think! (My daughter was kinda irked that mine cost $1 and she paid $25)


giveaways


Get your craft on Thurs.


Black Kats Design


Beyond The Picket Fence

Monday, August 23, 2010

Vinyl Hallway Tree

Well, 5 out of the 7 little ones started school today and I am beside myself trying to figure out which project to conquer first. I decided to start in the hallway. I have this spot in my hallway that I have re-decorated every few months for the past 4 years. I’ve had shelves, coat hooks, pictures, etc… Nothing seems to be just right.


Well a couple of months ago while perusing the craft blogs I found it. The vinyl tree!!! These are everywhere, but I refuse to pay upwards of $50 for one of them (sorry, I’m cheap)

First things first, you have to know where to get vinyl cheap. But you want to make sure it is good stuff. I order mine through 2 different places. First is Expressions Vinyl  I order tons of various colors by the SHEET (12”x24”) for only $1.89 a sheet. LOVE IT! Even with the shipping it is still cheaper than buying the name brand sheets at the stores and it is the same stuff. Second I use to buy rolls of vinyl CnCSigns it costs roughly $8.99 a roll (12” x 300”) It is SO worth it! Both places are great, I’ve never had a problem with either of them. And their shipping is quick!

Second I knew that I wanted a large tree, and after a really bad “flop” at trying to freehand one I decided I needed to find a better way. 

So I figuredwould print one out. I found one on Google images that I liked and decided to blow it up and print it out as a stencil. I love this program, PosteRazor  You just download your jpeg and then it resizes it into letter sized sheets. And it's FREE!  Gotta love that!  I just set my sizes at 4.5 feet tall and it did the rest. Then I printed out my stencil.
After a lot of cutting, and maneuvering and piecing it all together I set out and went to work.

Yes, this is why you don't have the 4 year old taking pictures...


I LOVE THE FINAL PRODUCT!

Simpsonized Crafts Keeping It Simple

Makingmmm button

Thursday, August 19, 2010

Sorry

Sorry I haven't been posting.  It is one crazy week we've had registration, one of my girls is in the fair (3 days in Weber County), finishing our back to school shopping, we've been potty training my little one, and it was my anniversary yesterday!  I promise we'll be up and running next week when school finally starts again!  YEA!!!!!!!!

Just for fun here's a cute photo, and YES those are his big boy underpants.... on his HEAD (where do you put them?)

Monday, August 16, 2010

Lookie What I Found

I am SO excited.  I have been looking for the perfect dresser to turn into an Entertainment center (hopefully the wallmounted TV will eventually come)  I've searched every DI from here to forever almost everyweekend.  I've hit too many garage sales to mention.  And when I had finally given up I found this...
It's PERFECT, of course it was once again sitting in room filled with "fido's" little presents but hey it was FREE!
You can't get better than that!  And it is SO sturdy.  The wood around the base is trashed (once again thanks fido-seriously people, if you have a dog train it!) It was obviously in a teenagers room (thanks to the graffiti on the walls) so it was all scratched up, but it is PERFECT! 

My kido's and I headed out and started sanding... It took hours but we finally got it done.  A couple coats of paint and VOILA!  I love it! 
I am tempted to find some specialized hinges for the middle drawers.  The kind that slide out and then down.  Then I would be able to open those drawers like cupboards and keep the cablebox, dvd, WII ect in them.  But hey, that will come....

HOG

Sunday, August 15, 2010

Heavenly Samoa Bars

So one of my other passions is cooking.... Baking to be more precise.... and if you want to get technical I LOVE to bake goodies with TONS of sugar!  So I thought I would show off one of my favorite recipes.  I found this one online sometime last year (sorry I forgot where, but if it is you let me know so I can give you the credit)  It is for Samoa cookies, you know, the heavenly Girl Scout cookies.  Well, according to my kids and most of the young women in my ward these are even better!

Ingredients
  • 1/2 cup sugar
  • 3/4 cup butter
  • 1 large egg
  • 1/2 tsp vanilla
  • 2 cups flour
  • 1/4 tsp salt
  • 3 cups shredded coconut
  • 12-oz good-quality chewy caramels
  • 1/4 tsp salt
  • 3 tbsp milk
  • 10 oz. milk chocolate chips
Preheat oven to 350F. Lightly grease a 9×13-inch baking pan, .In a large bowl, cream together sugar and butter, until fluffy. Beat in egg and vanilla extract. Working at a low speed, gradually beat in flour and salt until mixture is crumbly. like .Pour crumbly dough into pre-pared pan and press into an even layer. Bake for 20-25 minutes, until base is set and edges are lightly browned. Cool completely on a wire rack before topping.

Preheat oven to 300. Place coconut evenly on a lined baking sheet (preferably one with sides) and toast 20 minutes, stirring every 5 minutes, until coconut is golden. Cool on baking sheet, stirring occasionally. Set aside.

Unwrap the caramels and place in a large microwave-safe bowl with milk and salt. Cook on high for 3-4 minutes, stopping to stir a few times to help the caramel melt. When smooth, fold in toasted coconut. Put dollops of the topping all over the shortbread base. and spread topping into an even layer. Let topping set until cooled.

When cooled, cut into 30 bars Once bars are cut, melt chocolate in a small bowl. Dip the base of each bar into the chocolate and place on a clean piece of parchment or wax paper. Drizzle remaining chocolate on bars.

PURE HEAVEN!


Wednesday, August 11, 2010

The 'STINKY' Chair

Ok, confession time.  My favorite chair in the WHOLE house is affectionatly called (between my hubby and me) as the 'Stinky Dog Pee Chew Toy' Chair.  I know kinda long winded, but it is really a true statement. 

First let me let me take you back a few month ago.  My husband and I were in an abandoned house (don't worry it was completely legal)  It was DISGUSTING.  Seriously, I have come to believe that the dog ran the place.  It was truly so filthy that even the mice and cockroaches went elsewhere.  There was no electricity or water (but that didn't stop people from using the restroom...) and it was HOT and muggy inside this house.  Now I like to think that I have a really strong gag reflex, nothing makes me gag.... Untill this house.  Anyway's, I digress.... Upstairs in the west facing room (so it gets the most direct sunlight) was apparently the dogs 'haven'  (don't people teach their dogs to go OUTSIDE)  This is what the room looked like...
(See all that brown dirt on the floor, yup that's not dirt that's cute little fido's 'stains')

Anyways, do you see the chair turned over in the bottom left corner.  That's my favorite chair.  I truly think my husband almost passed out when I said I want THAT chair.  At first I think he thought I was joking, till I told him to pick it up and put it in the car (note, he had to pick it up, there was NO WAY I was going to touch it without gloves)

So he threw it in the back of the van and we drove strait home with the windows down and our heads out so we wouldn't pass out from the smell.  He kept looking at me funny (don't know why) and all I could say was it had 'good bones'  and i'm so happy I did.

He helped me strip off the rotting baby blue velvet, and we removed all 988 billion staples.  The padding was so soaked that.... we'll this is a family site so i'll stop there.  It took 2 days of working, gagging, working more, gagging, sanding painting and then..... finally.... off to Home Fabrics (seriously, can I get some sort of advertising discount)  I bought 1.5 yards of this great fabric for under $5/yd. 

This is what I've got now... My FAVORITE Chair.  I ended up having to redecorate the front room to match the chair.


Linking with

HOG

Tuesday, August 10, 2010

Stay Put Bookmark Tutorial

I have seen these elastic bookmarks all over, so I figured I would try to make one too.  They are really easy to make and WORK.  
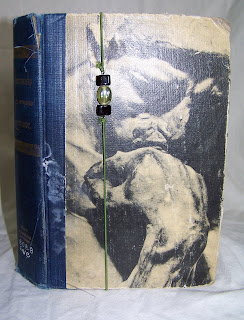
(On a side note, don't you love the old book I picked up for free at a garage sale!)

First you need to gather your supplies.  You will need elastic cording, beads, small pliers, and wire

  Cut a 17” piece of Elastic Cord. I have used the thin, clear jewelry elastic and that’s really pretty, but I prefer the Thick cord because I feel less likely to break it. I picked up this set at Michaels for $3.99 (so worth it)


Use your wire to create this shape
I actually had a bunch of earring making supplies, so I just straightened out one of the earring loops.

Put your beads on it and make a loop on the other end. Now for the tricky part. You want a knot that isn’t going to come undone, my personal preference is a Uni-Knot that is used for fishing.   Florida Sportsman is the best site for fishing knots. (Don't ask me how I know) 3 steps pretty simple…


The only difference is you only need to loop it 2-3 times and pull it tight. If you pull the long end it tightens up the loop. Then do the same knot on the other end of the beads. Clip the excess elastic off the knot, and voila!

A stretchy bookmark that stays put if your kids happen to ‘accidentally’ pick up your book.


If I’m making these for my kids I put a little drop of super glue on the knot to give it a little extra strength, but I’ve never had a knot come undone yet.


Photobucket


Creations by Kara


NightOwlCrafting